


Redshift Studies
This page contains some research that I made using Cinema 4d to evaluate how custom Redshift settings can affect quality and render times depending on the materials and lighting settings of my scene.
Later, I made use of different render passes to analyze how each pass can affect the different materials in post-production.
This research is meaningful considering the results can be used to reduce render times in production, and allow post-production flexibility through the use of the different render passes.
It is important to notice that render times might vary from machine to machine. For this study, I used a M1 chip Mac Mini with 16gb of RAM. The goal here is not to achieve the lowest render time that is humanly possible, but reduce the render time of the standard Redshift settings in my computer, and understand how each parameter might influence the render quality/time.
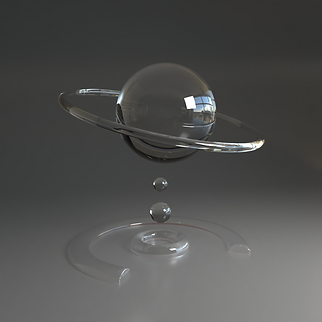
This is the scene I will be using for the test. Simple geometry with a plane that I beveled to use as my background. The same material was applied for the plane in all scenes to make the results clearer.


These renders were created using Redshift’s Autosampling mode. Here are the materials:
-
This is the scene with no materials applied in the subject. All we have is the background material, an area light, and an HDRI. Render time stayed between 1m and 14s - 1m 17s
-
Bumpy golden material: Metallic material with a noise being used as a bump map. Render time of about 1m 46s. We can observe a higher render time due to the fact that this material is reflecting light coming from the area light and other geometry
-
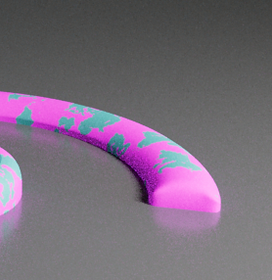
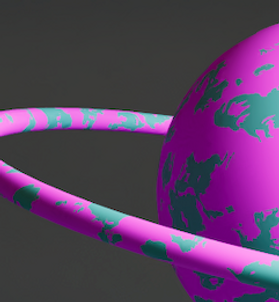
Rough material: Pink material with a teal pattern created through the use of a noise texture. Both have a high level of roughness, reflecting almost no light. Render time was surprisingly low, staying between 1m and 7s - 1m and 12s, slightly less than the geometry with no material. This makes me believe that my custom material had a higher roughness level than the default white surface Redshift assigns to geometry with no material at all.
-
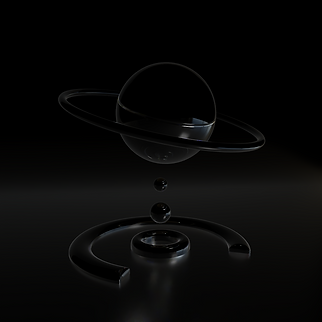
Glass material: As expected, a standard glass shader took a while to render. About 3m and 23 seconds, the highest render time so far. That is because materials with high levels of “Transmission” will require much more light ray calculations from the render engine.
-
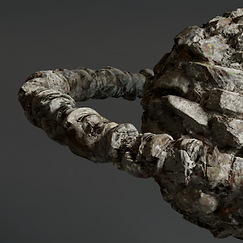
Textured material: This was the most complex material to make. I got all the maps from Poly Heaven. It includes a diffusion map, normal map, roughness map and a displacement map. The render time averaged around 2m and 25s.
First stage
The starting point for this study was trying to understand how to reduce render time by tweaking parameters like Threshold, Min. Samples, Max. Samples, and using Denoisers. Here are the main thing that I learned.


Right after disabling Autosampling mode, the settings Redshift present us is: Threshold = 0.01 / Min. Samples = 4 / Max. Samples = 16. Rendering time was 26.6 seconds and the image was quite noisy in the dark areas.


This render was created with the same settings but with the use of denoise. For this research I made use of the Altus denoiser. According to the Maxon documentation, the OIDN should be a faster denoiser, however, during my experiments, I did not notice anything that would be worth considering here, so I just decided to stick with Altus. The render time with these settings was around 50.8 seconds. We can definitely see an improvement. There is still some very minor inconsistencies in the shadows, but overall, I was satisfied with the result. What I was not satisfied with, was the render time. So I started experimenting with threshold values.


First, I disabled my denoiser and increased the threshold to 0.2 (In simple terms, the lower the threshold, the more noise Redshift is able to find by emitting primary light rays from the camera. Sample number works the other way around. The more samples, the more light rays will be emitted by the camera resulting in less grain) therefore, the render got extremely noisy, even in the lighter areas (Render time was very low (16.9 seconds)). The second image was produced with the same settings but with a Min. Samples at 16 and Max. Samples at 128 (Render time = 23.2 seconds). Both very short render times but the images were too noisy to be used.


With the same settings as the last image but with the denoise activated, this image was rendered in about 41 seconds. We can still see some subtle imperfections in the dark areas, but overall, I belive the final result was acceptable.
Second stage
During stage 1, I was able to reduce the render time by changing a few basic settings, but I could still observe some inconsistencies that were not present when I rendered the original image using the Autosample function. For this next stage, I decided to make some tests on the geometry with no textures. At this point, all the images were looking fine from a distance, so I will only focus in the areas that I felt that needed a closer inspection.


First image -> Autosample Mode / Second image -> 50s render with low threshold and low samples / Third image -> The 40s render with high threshold and high samples / Fourth image -> Since the subtle grain persisted, I decided to create a new render setting with a high numer of samples (16/128), low threshold (0.01) and denoise. It wook about 1 minute and 7 seconds for the render to be done.
Third stage
Moving on, I decided to go with the 40s render, mainly because it was the shortest rendering time and the quality was not too far off from the Autosample mode. Now it is time to see how those settings would look in the more complex materials.


For the golden and rocky material those settings worked pretty well. They took about 43 seconds and 49 seconds in that same order. The main problem was the glass material. The details of some of the reflections were pretty washed out, so instead of increasing the total number of sample, I decided to use custom override settings to fix the problem. The first picture below is the Autosampling render, the second is the render with no override and the third is the render with the override turned on.


Respective render times: 3min 23s / 1min 5s / 1min 38s
Final stage
The last setting I thought it would be relevant to cover in this research was Global Illumination. Considering this is a short study that uses a very simple scene, tests were a bit limited, but I will share what a learned below.

-
Redshift has two combinations of GI engines: Brute Force as the primary engine and Irridiance Point Cloud as the secondary one, or Brute Force as both the primary and secondary engine.
-
According to the Maxon documentation, Brute Force is slower but more accurate while IPC is faster and can struggle with compositions with a lot of fine details.
-
In order to complicate my scene, I added two planes around the geometry to increase light calculations, sincen now light will have more surfaces to bounce around.
-
The results that I got were not very clear. When rendering the geometry with both the rough material and with no material applied, using Brute Force as primary and secondary engine gave me way faster results.
-
I then decided to decrease the threshold to 0.01 and render the more complex materials. Only then using Brutal Force + IPC started to give faster results.
Those results left my quite confused since they contradict what the official documentation says. It might be an error on my end that should be revised in the future, or it might be a matter that my scene is too simple and unsuitable to test GI engines.
AOV Passes
To conclude this segment, I decided to render a few AOV passes of each material to exemplify how this feature could be useful during the production of 3d graphics.

Specular

Diffuse

Refractions

GI
Final Result
AOV passes are the layers that compose the final render (Beauty pass). By extracting other passes, you can later fine tune your image without having to re-render the whole image/animation, a process that can be very time consuming. On the right, you can see the same render but modified in Photoshop only with Level adjustments. It has way more contrast, making the glass material pop-out from the background
Reflections
Beauty pass

OpenXR and ACES workflow
As the last chapter of this render workflow study, we are moving to After Effects. In Redshift, I rendered an animation in the ACES color space, and saved it as OpenXR files, so all the AOV passes could be held in a single file.


The first thing I did was changing my Color Engine to OCIO color managed so I could get the default ACES settings. I also changed the bit depth of the project to 16 bit (depth of the rendered files) and made sure my OpenXR sequence was also set to ACEScg


Next, I used the EXtractoR tool in After Effects to access the different AOV passes contained in the OpenXR files.


Here you can see the changes in values and colors made in the original file. We can conclude by saying this is a powerful workflow, considering that precise changes can be made to 3d animations without having to re-render the entire product, allowing flexibility when working with clients.